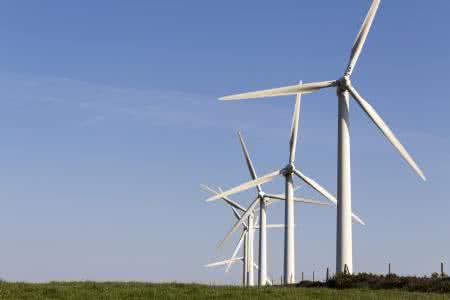
全木制风力发电机
风力发电
拖着磁铁在布满灰尘的车道上吸引收集到一堆磁铁矿屑
磁铁矿屑与环氧树脂混合,做成磁铁矿膏,填在定子的中心。
图片分享:
木制低转速交流发电机
这是一中木制发电机.只要你会木工技术.再懂点电工知识.假如你又在农村的话.你就能办得到!
After building the all wooden windmill I felt inspired to make a larger and sturdier version.建设后的所有木制风车启发,我觉得作出更大和更坚强的版本。
The following page offers a brief description of building the alternator and testing it.以下网页提供了一个简要说明建设的发电机和测试。
I designed this alternator WHILE I was building it, using mostly intuition and working around supplies available.我设计这个发电机虽然我是建设它,用直觉和工作主要是围绕用品可用。
Undoubtedly many improvements could be made.毫无疑问,许多可以作出改进。
If you have any ideas or thoughts about this, please share with us via email or our discussion board!如果您有任何意见或想法,请与我们分享通过电子邮件或我们的讨论板!
Para Espa?ol, traducción de Julio Andrade.第西班牙语, traducción七月安德拉德。
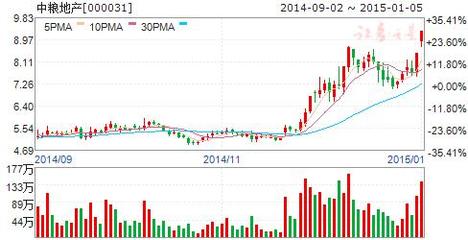
Initial test results--wired in series, reaches 12 volts for charging at 120 rpm, with 6 amps charging current at 300 rpm.初步测试结果-有线系列,达到12伏特的收费为120转,与6安培充电电流为300转。
Wired in parallel, reaches 12 volts at 240 rpm, with 12 amps charging current at 350 rpm.有线平行,达到12伏 , 240转,与12安培充电电流在350转。
At 500 rpm it produces about 500 watts.在500转产生500瓦。
Unfortunately this is the limit of our current testing rig--we need to build a bigger one.不幸的是 , 这是限制我们目前的测试平台-我们需要建立一个更大的。
More tests and a chart to come!更多的试验和图表来!
Parts and supplies used备件和用品使用
To build the alternator I used the following:建立发电机我用如下:
10" long piece of shaft, 1/2" diameter.10 “长片轴, 1 / 2 ”直径。
2 1/2" inner diameter ball bearings2 1 / 2 “球轴承内径
18 surplus NdFeB rare earth magnets18盈余钕铁硼稀土永磁
3/4" plywood3 / 4 “胶合板
5 Pounds 18 AWG magnet wire5磅18 AWG的电磁线
1 1/2" drywall screws1 1 / 2 “干壁钉
3" deck screws3 “甲板螺丝
Epoxy环氧树脂
Super Glue超级胶
Fiberglass resin for final finishing玻璃纤维树脂作最后整理
I cut out 5 plywood disks on a bandsaw, 9" diameter. In the center of each disc I drilled a 1/2" hole.我将进行5胶合板磁盘的带锯, 9 “直径。在中心的每个光盘我打了1 / 2 ”洞。
These disks are laminated on the shaft to build up the armature.这些磁盘上的轴层压建立电枢。
In order to hold the armature securely to the shaft, I drilled a hole about 4" from one end 1/8" diameter, and inserted the a pin, 4" long. On one disk I routed a slot, 4" long and 3/16" wide, 3/16" deep, to accept this pin so that it would be locked to the shaft.为了安全地举行电枢的骨干,我钻了一个孔约4 “的一端1 / 8 ”直径,并插入了一个引脚, 4 “长。在一个磁盘I路由的插槽, 4个”长期和3 / 16 “宽, 3月16日”深,接受这一引脚SO ,它将被锁定的骨干。
I generously coated the plywood discs with wood glue and clamped them together on the shaft, then screwed them together with 3" wood screws.余慷慨涂层光盘的胶合板与木材胶和钳制在一起的竖井,然后拧在一起3 “木螺丝。
On the metal lathe (a wood lathe would work fine) I evened up the armature so that the diameter is approx 8.75". In the center of the armature I cut a slot 3/16" deep exactly wide enough to accept the magnets (1.74"). The magnets are laid in with alternating poles facing up. This particular magnet is available with either North or South on the outside. This alternator requires 9 of each variety. The diameter is such that the magnets stick out from the wooden surface of the armature, so the total diameter, magnets included of the armature is just short of 9.25".金属车床(木车床将罚款)我最终的电枢使直径约8.75 。 “的中心电枢我将一个插槽3月16日”深完全足够广泛接受磁铁( 1.74 “ )。该磁体是埋在交替极朝上。这种特殊的磁铁可带有北方或南方的外面。这个发电机需要9每个品种。直径为使磁铁棒从木质表面电枢,所以总直径,磁铁包括电枢只是短期的9.25 “ 。
These magnets have an arc much more acute than that of the armature, so it looks kind of "lumpy"!这些磁铁有更严重的电弧比电枢,因此它看起来种“块状” !
I don't think this is a problem.我不认为这是一个问题。
Custom magnets simply cost too much, it often pays to work with that which is available.自定义磁铁只是成本太大,往往支付给工作与现已。
In order for 18 magnets to fit around the armature, there is a small space between each magnet (approx 0.10"). For spacers, I used 1" drywall screws, which were removed after the glue dried.为了让18磁体,以适应各地的电枢,有一个小空间相互磁铁(约0.10 “ ) 。为间隔,我用1 ”干壁螺丝,被移走后,胶水干。
Since they are tapered at the top, simply screwing them in deeper provides for a larger gap between the magnets, so...with a little patience, it is easy to adjust the screws and get the magnets evenly spaced around the armature.因为它们是圆锥顶部,只需拧他们提供了一个更深的大磁铁之间的差距,所以...有一点耐心,很容易调整螺丝,让磁铁间隔均匀的电枢。
Once all the magnets were pressed in place, properly spaced with screws, I glued them in with epoxy.当所有的磁铁被压到位,适当间距的螺丝钉,我盯着他们与环氧树脂。
As a clamp, I simply tied a rope around the magnets and tightened it with a stick through the knot.作为一个夹子,我只是用绳子捆绑在磁铁和加强它用棍子通过结。
When the glue started to set up hard, I removed the screws and applied a new coat of glue over the entire surface of the alternator.当胶水开始建立硬,我删除了螺丝和应用新的大衣胶水的整个表面的发电机。
This not only aids in holding down the magnets, but it will protect the alternator from moisture.这不仅艾滋病按住磁体,但它可以保护发电机防潮。
定子(即一部分最终将举行线圈线)建成的3 / 4 “胶合板。内循环半径5 ” ,其中余地线圈之间,和电枢。
The magnets protrude from the wooden alternator approx 1/8", so this allows for coils to be approx 3/8" thick and have close clearance with the magnets.磁体伸出的木发电机约1 / 8 “ ,所以这使得线圈的约3 / 8 ”厚,有密切的关与磁铁。
A very small gap between coils and magnets is important, especially if the coils do not have a ferrous core.一个非常小的差距线圈和磁铁是重要的,尤其是当线圈没有有色金属核心。
I cut pieces to build up the stator from the plywood and glued them together, clamped them tight and screwed them together with 1 1/2" drywall screws. Each piece is made up of 3 laminates, for a total thickness of 2 1/4".我将只建立定子从胶合板及粘合在一起,钳制他们和拧紧他们连同1 1 / 2 “干壁钉。每片由3层板,总厚度为2 1 / 4 “ 。
继续.
The shaft is supported by pillow blocks, also built up from 3/4" plywood pieces. I cut holes with a 1 1/2" hole saw to accept the bearings.轴的支持,枕头块,还建立了由3 / 4 “胶合板件。我将洞的1 1 / 2 ”洞看到接受轴承。
Of course, the bearings have 1/2" inner diameter to accept the shaft. The outer diameter of the bearings is roughly 1.6" inches - a very tight press fit into the holes in the plywood.当然,轴承有1 / 2 “内径接受轴。外径轴承大约是1.6 ”英寸-非常紧凑出版社融入洞胶合板。
I coated the outside of the bearings with epoxy and pressed them in with an arbor press(a vice, or hammer should work fine too), as deep as possible so that I could still tighten the set screws.余涂层的外部轴承环氧树脂和压制他们的安娜堡新闻(副主席,或锤应该也没关系) ,深使我仍然可以加强紧定螺钉。
I was pleased with how well they fit the holes, and how straight they pressed in. I believe I got a little lucky here!我很高兴与他们如何配合的漏洞,以及如何,他们连续按下英寸我相信我有点儿幸运了!
I built a simple coil winding device to speed production.我建立一个简单的绕线设备,高速生产。
It has a crank on one side, and a spool on the other.它有一个曲柄一方和缓冲为另一方。
I used a long bolt as a shaft, and the end of the spool is held on with a nut.我用很长的螺栓作为骨干,并在年底举行的阀芯是一个螺母。
Each coil is wound on the form, then the nut is removed...so that the end of the spool comes off and the coil can be removed.每个线圈的形式伤口,然后螺母被删除...这样的结束阀芯脱落后的线圈可以被删除。
It went very quickly!它接着很快!
Since the alternator has 18 magnets, I wound up 18 coils.由于发电机有18个磁体,我结束了18圈。
The coils are of AWG 18 enameled magnet wire, each coil has 50 wraps.线圈是特设工作组18漆包线电磁线,每圈有50套。
The coils are approx 2.75" X 1.5" on the outside, and the hole in the middle is approx .5" X 1.5"....as per the size of the spool on the winding machine.该线圈也约2.75 “ × 1.5 ”的外面,和孔在中东约0.5 “ × 1.5 "....按大小线轴上缠绕机。
I thought this was an appropriate size, considering the size of the magnets.我想这是一个适当的规模,考虑到大小的磁铁。
Really - it's somewhat of an intuitive guess...真的-这是有些直观的猜测...
When the coils come off the winding machine, they are fairly loose, and delicate.当线圈脱落的缠绕机,它们是相当松散的,而微妙的。
I handled them carefully before gluing them into the stator laminates.老子处理他们之前仔细粘合成定子层板。
In the above image you can see all the parts of the alternator ready for finishing and assembly.在上面的图片你可以看到所有部分发电机准备整理和集会。
For the first step in attaching the coils (not shown in any pictures) I measured out their proper location (they must be spaced evenly) and lightly tacked them in with super glue.对于第一步附加线圈(不显示任何图片)我衡量自己的适当位置(他们必须间隔均匀)和轻汇价他们与超级胶。
Then I generously coated them with super glue (epoxy would also work fine...it would just take longer), covered them with wax paper, and clamped them in using a form I cut from wood.然后,我与他们慷慨涂层超级胶(环氧树脂还要罚款...它只是需要更长的时间) ,包括他们蜡纸,并钳制他们使用的一种形式我将木材。
This form forces them into exactly the right diameter to fit around the armature.这种形式迫使他们到正确的直径,以适应各地的电枢。
Once the glue was dry, I removed the clamp, the wooden form and the wax paper, and was pleased to find they fit very well!一旦胶水未干,我删除了钳,木制形式和蜡纸,并高兴地发现,他们非常适合!
In the future, I may fill the center of these coils with a mixture of magnetite sand and epoxy - this would help conduct the magnetic field through the coils, and increase the current output of the finished alternator.在未来,我可以填补中心与这些线圈混合磁铁矿沙和环氧-这将有助于进行磁场通过线圈,提高电流输出的成品发电机。
For now, I'm very curious to find out how it perfoms with nothing but air between the coils.就目前而言,我非常好奇,了解如何与它perfoms只是空气之间的线圈。
There is also an advantage to "air cores" inside the coils--the alternator will not cog at all until under a load, which eliminates much vibration and will help the alternator start spinning in some applications.还有一个优势, “空中核心”内的线圈-发电机不会齿轮,直到下在所有的负载,从而消除振动和大部分将有助于发电机启动纺纱在一些应用。
Cogging is a problem in permanant magnet alternators, especially for wind generators.齿槽是一个问题永磁交流发电机,特别是对风力发电机。
After the coils are glued in, all that remains is sanding and finishing.在线圈粘合的,这一切仍然是打磨和修整。
Thankfully I had some help from our head of research, development, and particle physics....Maya!幸好我有一些帮助,我们的负责人研究,开发和粒子物理....玛雅!
继续.所有部件都慷慨涂层玻璃纤维树脂-有点像环氧树脂,它使厚,塑料外壳,并应使发电机几乎防水多年。
The only drawback...it stinks real bad!唯一的缺点...它stinks真正的利空!
You can get this stuff at any hardware or auto parts store.您可以取得这些东西在任何硬件或汽车配件商店。
Difficult to see in this picture, but...the base of the alternator has wooden dowels in it, so that all the parts can be exactly located in their proper position whenever the unit is assembled.很难看到的这张图片,但...基地的发电机已在木制销,所以,所有的零件可以完全位于其适当的位置时,该单位是组装。
This allows for easy assembly and disassembly.这便于装配和拆卸。
When making the base, I put the parts together so that it spun easily--the coils were as close as possible to the magnets, and nothing rubbed.当决策的基础,我把零件一起,使它很容易打滑-线圈是尽可能接近的磁铁,并没有任何摩擦。
Then, I tacked the whole alternator together lightly with super glue and drilled 1/4" holes up from the bottom of the base into the pillow blocks, and both stator halves. I then glued into the base 1/4" dowel pins which assure that whenever assembled, all the parts will fit exactly into the right places.然后,我汇价整个发电机一起轻易超胶和钻探1 / 4 “洞从底座的底部到枕头块,两个定子一半。然后我粘到基地1 / 4 ”桩脚的保证每当组装,所有部件完全变成适合适当的地方。
After the fiberglass resin set up, I assembled everything on the base.在玻璃纤维树脂成立,我组装一切的基础上。
Everything fit well--the clearance between coils and magnets was excellent.一切都很好-清除线圈和磁铁之间良好。
Once all looked good, I screwed it together from the bottom with 3" deck screws. It seems very sturdy--nothing moves, rubs or vibrates that's not supposed to! At this point I wired all the coils on each stator half into series. The coils must alternate in the direction they are wound. It can seem confusing! Trial and error isn't the worst way to be sure it's properly wired. Simply spin it slowly by hand, and start measuring voltage, starting with one coil, and being certain that the voltage increases with each additional coil which is wired in series.一旦所有看上去很好,我拧在一起,它的底部有3 “甲板螺丝。看来非常坚固的-没有任何动作, rubs或震动,这不是要!在这一点上,我有线所有定子线圈每半年到系列。线圈必须候补方向他们的伤口。它可以似乎混淆!试错不是最糟糕的方式,以确保它的正确有线。只需旋转,慢慢的手,并开始测量电压,从一个线圈,被确定的电压增加,每增加线圈是有线系列。
All the coils on each half of the stator are wired together in series.所有圈的每个一半的定子是有线一起系列。
At that point, each half can be hooked in either series or parallel to most appropriately match the load with the alternator.在这一点上,每半年可连接在这两种系列或平行的最恰当的负载匹配的发电机。
Above is pictured the good old Taste Test, a sure fire way to test any battery, or generator, as long as it stays below about 10 volts!以上照片是旧的好口味测试,确保消防任何方式来测试电池或发电机,只要它下方大约10伏特!
(otherwise it hurts--don't try this at home!)(否则,伤害-别在家里尝试! )
I don't have proper equipment to fully test this alternator.我没有适当的设备,以充分测试此发电机。
The best tool I have, since it will not fit on my lathe, is a hand drill with a 1/2" chuck. With a meter which reads frequency, I am able to accurately tell rpm. When both halves of the stator are hooked in series, the alternator will reach 12 volts at approximately 120 rpm. At approx 300 rpm, it charges approx 6 amps into my batteries (this is the limit of my hand drill!). When I hook both halves of the stator in parallel, it hits 12 volts at approx 240 rpm, and at approx 350 rpm it's charging slightly over 10 amps into my 12 volt batteries. In the picture above you can see the frequency meter, and the large wooden ammeter on the wall. Clearly the limiting factor here is the power of the hand drill. I'll post a chart when I build a good alternator test machine and get some better results! All things considered here, I'm very pleased with the results.最好的工具我有,因为它不适合我的车床,是一个手钻的1 / 2 “夹头。随着一米,其内容的频率,我能够准确地告诉每分钟转速。当两部分定子是上瘾在系列,发电机将达到12伏在约120转。大约300转,它的费用约六安培到我的电池(这是限制我的手钻! )。当我钩的两定子平行它安打12伏特大约240转速,并在约350转的收费略高于一十安培到我的12伏电池。上面图片中可以看到频率计,和大木电表墙壁上。显然,限制因素这里的权力移交演习。我会后有一个图表,当我建立了良好的交流发电机试验机和获得一些更好的结果!全面考虑在这里,我很高兴的结果。
I was curious what the output would look like on the scope, considering the close proximity to one another of the magnets, and the "lumpy" armature.我很好奇的输出将是什么样子的范围,考虑到邻近的一个磁铁,和“块状”电枢。
Keep in mind, what is shown above on the scope, is Alternating Current, directly out of the alternator.请记住,什么是上面显示的范围,是交流电,直接的交流发电机。
In order to be useful in batterycharging, it must be rectified into Direct Current.为了有利于batterycharging ,必须予以纠正成直流。
To do this a "bridge rectifier" (a simple arrangment of 6 diodes) must be used.这样做的“整流桥” (一个简单的安排, 6二极管)必须使用。
Shown above is the "rectified" output of the alternator.如上所示,是“纠正”产出的发电机。
This is useful for battery charging, but - you'll notice how "lumpy" the Direct Current looks on the scope.这是有益的电池充电,而且-你会发现如何“块状”直流期待的范围。
Although this rarely causes problems, occasionally this sort of Direct Current will cause problems with radio and television reception (you'll hear a whine).虽然这个问题的原因很少,有时这种直流会导致问题与当地的无线电和电视接收(您将听到呜咽) 。
To help smooth out the Direct Current available here, a capacitor can be used.为了帮助理顺直流可在这里,一个电容都可以使用。
See above the nice, flat DC output after a capacitor is hooked up between Pos and Neg outputs.在上面看到的尼斯,平直流输出电容后,连接的POS和否定的产出。
继续.为了好玩...我上瘾它,我的立体声!
This is a CD player, hooked to a '50's Fisher vacuum tube preamp, hooked to a Dynaco Stereo 70 vacuum tube power amp.这是一个CD播放机,连接到'50氏费舍尔真空管功放,连接到Dynaco立体声70真空管功放。
If you add up the numbers on the back of these...it totals over 300 watts.如果您购买了数字后面的这些...它总数超过300瓦。
To my amazement, this wooden alternator lit up the tubes and the CD player...played music and sounded just fine, when powered by the electric hand drill!我惊讶,这木制发电机照亮了管和CD播放机...放音乐和听起来不错,当采用电动手钻!
The hand drill is rated to draw maximum current of about 3.5 amps...so this is a reasonably efficient transfer of power!手钻额定提请最大电流约三点五安培...因此,这是一个合理有效的权力转移!
In conclusion...最后...
This whole thing took about two full days time, about $100 in magnets and $30 in magnet wire.这整个事情花了两整天的时间,约100美元的磁铁和30美元电磁线。
(The shaft and bearings I had on hand) Not a bad price for an effective low rpm alternator.(轴和轴承我手头上)不是一个糟糕的一个有效的价格低转速发电机。
It was also fun, and the information obtained is useful.也有人乐趣,并获得的信息是有益的。
Using premade pillow block bearings would probably be wise, especially if one intended to really use the alternator!使用premade枕块轴承可能是明智之举,特别是如果要真正使用发电机!
There are certainly easier ways to build alternators which would be just as, or even more effective.当然,还有更容易的方式,建立交流发电机将一样,甚至更有效。
To build this really requires a lathe, bandsaw, drill press...etc.建立这确实需要一个车床,带锯,钻床等...
If one built a similiar machine using a disk type armature instead of a cylinder, it would be much simpler.如果建立了类似的机器使用的磁盘类型电枢不是缸,这将是非常简单的。
I stuck with this design only because it seemed fun, looked neat - and was based upon my earlier wooden windmill.我坚持这一设计不仅是因为它似乎乐趣,看着整洁-并根据我早些时候木制风车。
Keep your eyes peeled for our next alternator..it'll be even easier to build and much more effective.保持你的眼睛去皮为我们的下一个发电机..它会更容易建立和有效得多。
Overall though, I'm surprised with the performance fo this unit, considering it contains nothing but air between the coils and wood all around.总体不过,我很惊讶的表现为这个单位,认为它包含只不过线圈之间的空气和木材各地。
Wood is a lousy conductor of magnetic fields! Just goes to show...it doesn't have to be optimal, it just has to work!木材是一个糟糕的导体磁场! 只是显示...它没有为最优,它只是在工作!
It seems that there may be some argument for not worrying too much about steel laminates, or ferrite cores in the coils, and simply adding a few more magnets and wires and settling for a somewhat larger machine.看来,可能有一些令人担忧的理由没有太多钢层板,或铁氧体磁芯的线圈,并简单地增加一些磁铁和电线,并解决了多少更大的机器。
One immediate benifit of having "air coils" is obviously the complete lack of cogging, which, if used in a windmill should result in a machine that starts very easily.一个直接的好处有“空气弹簧”显然是完全没有脉动,而如果使用风车应导致机器,开始变得非常容易。
I have no idea at this point what the maximum output of this alternator might be, but preliminary tests are impressive in my opinion!我不知道在这一点上是最大输出功率为这个发电机可能,但初步测试是令人印象深刻的在我看来!
One could build a fine wind or hydro plant with such a machine.我们可以建立良好的风力或水力发电厂,这样的机器。
As with all our other alternator "experiments"...it is truly the magnets which make it possible!至于我们所有其他发电机“实验” ...它是真正的磁铁,使人们有可能!
Without these super high quality magnets, this alternator would not be nearly as effective.如果没有这些超级优质磁铁,这个发电机几乎不会有效。
With normal ceramic or AlNiCo magnets, one would have to go to much greater lengths to build a alternator which efficiently produces this kind power at such low rpm.与正常陶瓷或铝镍钴磁铁,人们会去更大的长度,以建立一个有效的交流而产生这种力量在如此低的转速。